|
To Create Your Personal Profile
To create your personal profile you must access yours at: http://www.ivillage.com/profile/private. This will take you to a log-in page. Once you have logged in you will be taken to your profile layout pages.
Make sure you are on the page that says "Welcome to your profile!"
at the top and NOT the page that says "Welcome! This is how your profile looks to other people."
~ you cannot change your profile in any way if you are on the wrong page!!!
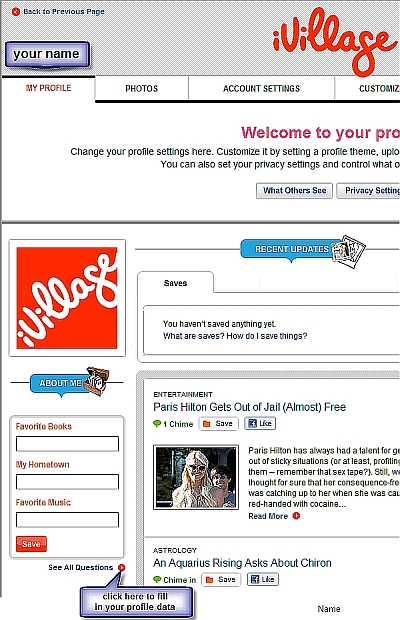
You will see your name at the top left of the screen.
The tabs at the top of this page are:
MY
PROFILE PHOTOS
ACCOUNT SETTINGS
CUSTOMIZE
NEWSLETTERS
To actually begin to fill in the contents of your profile you need to scroll down until
you see the words "See All Questions". Click on that. You will be taken to a new page with the heading "Account Settings".
There are three options listed at the upper left side of that page:
Account Info
Personal Info
Privacy
The "Personal Info" is highlighted
and that is the page you are now on.
Please understand that the information that is at the top of that page that you
are requested to fill in will NOT ever be seen by anyone visiting your profile. That is only for use by the iVillage
staff. Fill in the questions in that portion of the page and click on the
"Save Changes" button right below it.
Now - fill out the rest of that page to create the profile that others will be able
to see. When you have completed answering your profile questions (you choose which ones you want to answer) be sure
to click on the "Save Changes" button at the bottom of that section!
Check out the other options to ensure that your privacy is protected:
Account
Info: You may edit your avatar or the email address that is associated with your iVillage account and
your account password on this page.
Privacy: Here you can control who can see which sections of
your public profile.
The other TABS - a brief explanation of each.
Play with them - it is not difficult to understand what is going on at each!
PHOTOS:
Here
you can edit your existing photos or upload more. You can set the privacy level for the entire album or individual photos.
CUSTOMIZE:
Profile customization: Here you can opt for the various color schemes offered, and the various frames offered
for your Avatar. (this feature is also accessible on the front page of your Profile at the far right!)
Tools: From this page you can choose any
"tool" that you wish displayed on your Profile. (this too can be accessed on the front page of your Profile at the far
right!)
NEWSLETTERS
From here you can choose from among the many Newsletters that iVillage offers. These
are then delivered to the email address that you used when you registered. (this too can be accessed on the
front page of your Profile at the far right!)
NOTICE at the far right of your each page are two buttons: "My View"
and "Public View". By clicking on either of them you are taken to either a view of what you see when
you come to your Profile or what the public sees when they go to your Profile!
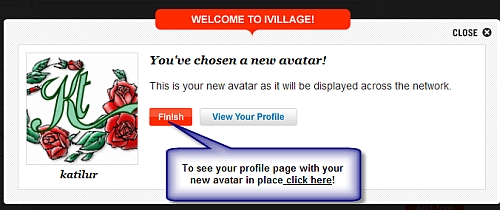
What is your Avatar? This
is the picture that will be seen at the far left of every message you post at iVillage as well as in your Profile.
To create your Avatar you need to follow the same starting steps that
you followed to create your personal profile. Click on the following link: http://www.ivillage.com/profile/private. This will take you to a log-in page. Once you have logged in you will be taken to your profile layout pages.
Make sure you are on the page that says "Welcome to your profile!"
at the top and NOT the page that says "Welcome! This is how your profile looks to other people."
~ you cannot change your Avatar if you are on the wrong page!!!
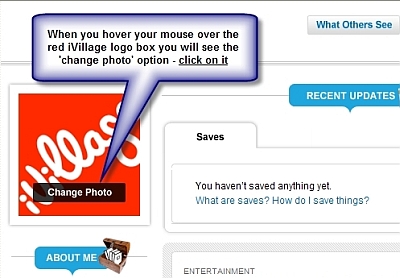
To start the process of creating yours, move your mouse over the box
at the upper left where the red iVillage logo is shown. You will see the words "Change Photo" appear. Click on
that option.
Your Avatar will sometimes take a while to load. You might not see it until
you have rebooted your browser. But - it WILL show up eventually!!!
After you have created your Avatar you can access it from any iVillage Board page.
Simply click on your user name then follow these steps:
- Select "See my iVillage Profile"
-
Select "Go to My View"
- Click on your existing Avatar and follow the steps for creating your Avatar
 |
|
|
These *added* comments will be removed as soon at the Avatar Upload issue has been fully resolved.
Meanhwhile....
Be patient. Make sure each page has loaded completely before you
try to move on. If you do not see a list of iVillage-provided avatars before you try to upload your own it will NOT
work! If they never load, back up and start over! If you accidentally click twice (because it looks
like it didn't take!) on the button that tells it to proceed you may cancel your efforts and have to begin again.
Once you get your new Avatar uploaded AND can actually see it on your Profile page (and, sorry gals,
the system is still a bit touchy and this may take a few tries!!!) then come back to the board to see if you can see it here.
If not, log out and back in. If that does not work, close your browser session and open a new one. Your new Avatar
should show up then!
|
|
|
|
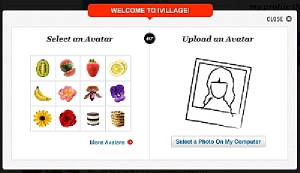
You have two options in creating the Avatar that you wish to
use.
1. Choose one of the many that is provided by iVillage simply by clicking
on one of those shown on the "Select an Avatar" or by selecting the option to view "More Avatars" and selecting one from
those offered. Once you click on one of those avatars it will be put into your Avatar box for you.
2. Choose to upload a picture or graphic image from your personal
computer by clicking on that option. You will be taken to a screen giving you the following message:
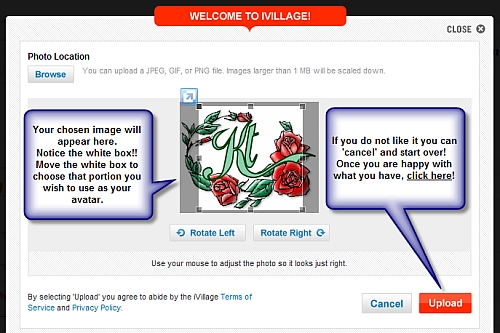
Photo Location
Browse You can upload
a JPEG, GIF, or PNG file. Images larger than 1 MB will be scaled down.
Click on the Browse button and find the image you wish to use and select
it.
The picture you have chosen will be brought to your screen and you will
be given editing options.
Your avatar will be re-sized "to fit" should you choose more of your
picture than will fit the optimum space provided. That space is 150 x 150 pixels.
If you do not like what you are seeing, you can cancel out and start over!
If you choose to keep what you have created and "Upload" it you will
see the following screen.
Remember that if you wish to change your Avatar at any time you can simply
repeat these steps!
Return to top of page.
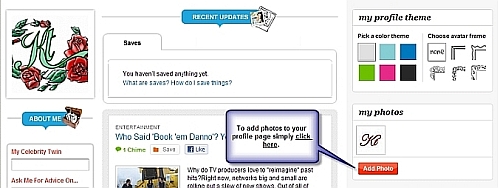
To add pictures to you profile Photo Album simply click on the "Add Photo"
option indicated in this picture!
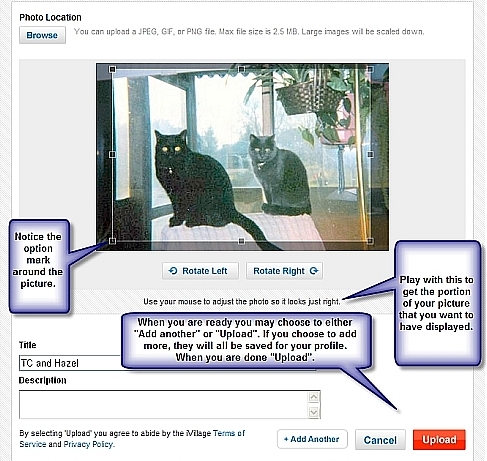
You will see the following option:
Photo Location
Browse You can
upload a JPEG, GIF, or PNG file. Images larger than 1 MB will be scaled down.
Click on "Browse" and find the picture on your computer that you wish
to upload.
Please notice the editing box (dashed lines and little boxes) that surrounds
your picture. You can re-size you picture or choose only a portion of it by using those editing lines.
When you are satisfied with your picture you may "Upload" it or you may
choose to upload another picture. Either way your edited picture will now be in your Photo Album.
Please remember that the pictures displayed in your album are NOT protected from
theft by anyone who views them.
Return to top of page.
To exit this page and return to the 50 & Up
Website click here.
To exit this page and return to the Menopause Oasis
click here.
|